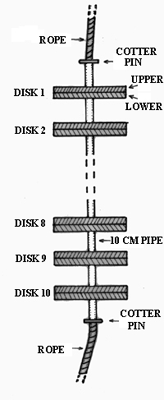
The rack can be constructed by attaching disks in layers.
We suggest that the disk rack is build in ten levels,
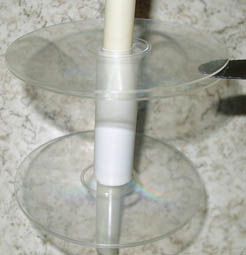
each level consisting of two disks.
When the disks are taken out of the water,
it is easy to examine the upper and the
lower side since it consists of two
separate disks.
The rack can also be put together in a simple way using plastic disks or CD-disks. The disks are separated by thick plastic pipes at 10 cm intervals. If you want to make a rack with ten disk levels, we suggest that you use twenty disks, two at each level. Then the organisms on upper and the lower part of a level can be observed separately. The rack can be held together with a thin pipe, one meter long or simply by a thick rope. A five litre plastic container can be used as a bouy and stones can be used as weights.
Detail of rack showing that each level of the rack consists of two disks (a knife is put between the upper and the lower disk of a level)
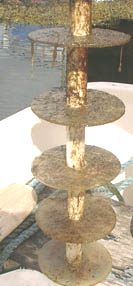
Rack with five levels of disks from Osterfjord in Norway. This rack was put into the sea in March and photographed in May. Juvenile barnacles and mussels could be observed on the disks using a magnifying glass. A plastic bouy/can at the top and a weight in the bottom kept the rack vertical in the sea one meter below the surface.